Controlling Raspberry PI Ports via JAVA REST API provided on Tomcat

This post describes how you can install a tomcat server on your Raspberry Pi and access the ports via REST API running a JAVA webapp.

Installing Tomcat 8

Installing Tomcat 8 is pretty straight forward. First, make sure, that Java is installed (which is the case on most distributions).

Next, install tomcat itself als well as the tomcat admin tool using apt-get:

sudo apt-get install tomcat8
sudo apt-get install tomcat8-admin

Now, you should already be able to call the welcome page of tomcat from the browser "http://<your-raspberry-ip>:8080/".


Changing Tomcat Privileges

Later on, we want to access the hardware layer of the Raspberry PI which requires root privileges. Hence, we configure tomcat to run with root user. I know this is a security issue, but for now I have not found another solution to be able to access the hardware. If anyone knows a better solution I am happy to report on it. For now, we will use this workaround and as in my case the Raspberry is only accessible from the local network the issue isn't that big.

sudo vi /etc/default/tomcat8

and change the assignments as follows:

TOMCAT8_USER = root
TOMCAT8_GROUP = root


Changing Tomcat Port to Default Port 80

In order to access our webservices on standard HTTP port 80, we need to change the port setting of tomcat in the server.xml file:

sudo vi /etc/tomcat8/server.xml

and replace the section:

<Connector port="8080" protocol="HTTP/1.1" connectionTimeout="20000" redirectPort="8443" />

by

<Connector port="80" protocol="HTTP/1.1" connectionTimeout="20000" redirectPort="8443" />


Configure Tomcat Users

By default, no users and no admin users are configured for tomcat. We need an admin user to upload and deploy WAR files from remote. Hence we need to edit the tomcat-users.xml file as follows:

sudo vi /etc/tomcat8/tomcat-users.xml

In the <tomcat-users> section add the following lines

<role rolename="tomcat"/>
<user username="tomcat" password="yourpwd" roles="tomcat"/>

where yourpwd stands for your password to be used together with the tomcat user. 

Restart

To get all the changes applied, you need to restart your Raspberry, best by unplugging the power supply for some seconds. After restart, tomcat should by accessible via "http://<your-pi-address>/"


Deploy the piweb Web Application

The web application providing the REST API to the ports is available on Github at https://github.com/tblickle/piweb.

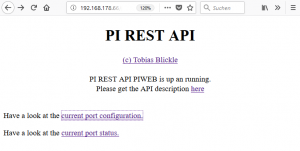
You can deploy the ready-to-run piweb.war by downloading it form https://github.com/tblickle/piweb/blob/master/target/piweb.war amd upload it to your tomcat. Just open the manager UI from tomcat by opening http://<your-pi-address>/manager and entering tomcat as user and the password (yourpwd) configured above. Scroll down to the "deploy" section and browse the piweb.war file from your local disk. Then press on deploy button and after some seconds the web application should be up and running. Call http://<your-pi-address>/piweb in the browser and you should see the following page:

More information on the piweb REST API can be found on Github, the Swagger REST API documentation is available here.


Schreibe einen Kommentar